The WordPress.com dashboard is easy to set-up, customize and use the way you want to. This video walks you through it’s features
Widgets Overview
This short video introduces you to adding and managing widgets on your WordPress.com blog.
Adding New Links to Your Sidebar
 Adding links to your blogroll doesn’t do anything for your readers unless you display them on your blog. So make sure to add the Links Widget.
Uploading Images into Your Website
Photos are a great way to enhance your website blog. We love photos and are always posting them to our blogs.
Uploading Images
You can upload the following image types to yourwebsite blog using the Add an Image icon:
- .jpg/.jpeg
- .gif
- .png
Note: To only upload an image to your blog’s Media Library (and not attach it to a specific post/page), use Media->Add New in your dashboard.
From Your Computer
- Go to Posts -> Add New, Pages -> Add New, or open an existing post in editing mode.
- Place your cursor where you would like the image to appear, and click on the Add an Image icon found in the Upload/Insert icon group directly above your editor.

- Click on the Select Files button and choose the image file from your computer.

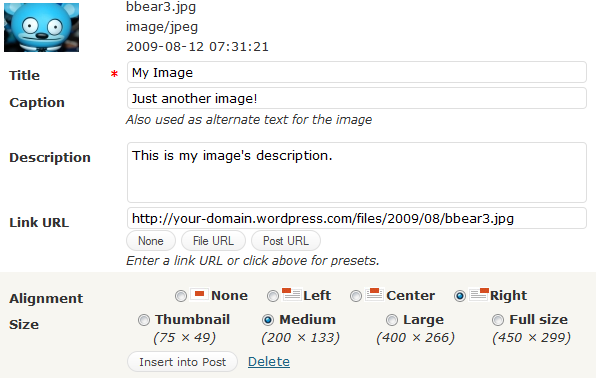
- Once the uploading/crunching process has completed, you will be given the option to edit some settings before inserting the image into the post/page.

- Once the uploading/crunching process has completed, you will be given the option to edit some settings before inserting the image into the post/page.
Title – Text displayed as a tooltip (when a mouse is hovered over the image)
Caption – Image caption displayed directly underneath the image (will also serve as the alternate text.)
Description – Text displayed with the image in your dashboard and attachment pages on your blog.
Link URL / Link Image to: – The URL/web address to which the image will be linked. Click the File URL button to link the image to its original, full-size version. Click the Post URL button to have the image linked to its attachment page.
Alignment – The position of the image within your post or page.
Size – The size of the image. You can change this later under Settings -> Media.
5. When finished choosing your image settings, click on the Insert into Post button.
From URL
The following process describes inserting an image which already exists on another web site or domain. This method will not upload the document/file to your blog’s Media Library. Because it is hosted elsewhere, the file is removed from its location, the image will no longer work on your blog.
- Go to Posts -> Add New, Pages -> Add New, or open an existing post in editing mode.
- Place your cursor where you would like the image to appear, and click on the Add an Image icon found in the Upload/Insert icon group directly above your editor.
![]()
3. Click on the From URL tab

4. You will be given the option to edit the settings defined above before inserting the image into the post/page.
5. When finished choosing your image settings, click on the Insert into Post button.

6. You will be given the option to edit the settings defined above before inserting the image into the post/page.
From Media Library
The following process describes inserting an image which already exists in your blog’s Media Library.
- Go to Posts -> Add New, Pages -> Add New, or open an existing post in editing mode.
- Place your cursor where you would like the image to appear, and click on the Add an Image icon found in the Upload/Insert icon group directly above your editor.
![]()
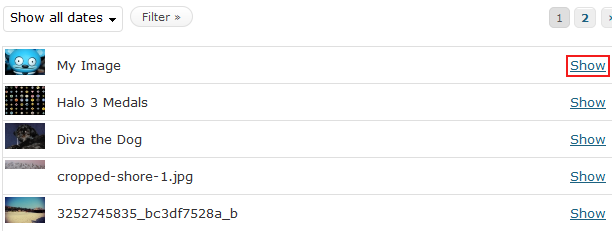
Click on the Media Library tab.

Locate the image you wish to insert and click its Show link.

You will be able to edit some of the image’s settings before inserting it into the post/page. Note that the fields will already be populated if you previously added the information when you uploaded your image to the media library.

When finished choosing your image settings, click on the Insert into Post button.

Children and Blogging
According to WiredSafety.org, over 6 million underage children write blogs with or without their parents’ knowledge. Blogging is particularly popular among children who see their parents blogging either professionally or personally.
Should parents allow their children to blog? How can parents ensure their children are blogging in a safe manner?
What’s all the Fuss About?
A vast number of blogs written by children can be found through MySpace whose terms of service clearly state that anyone over 14 may start a blog through the service. LiveJournal is another popular blogging option for kids and teens. The policy for LiveJournal states that anyone over the age of 13 can start a blog through the service. Unfortunately, there is also a large number of blogs written by children younger than 14 on MySpace, LiveJournal and through other blogging services and software programs. These kids simply lie about their age in the registration process.
Online safety is a big concern for most parents. Should children under 18 be allowed to blog at all? How can parents keep their blogging children safe online. Following is a review of the benefits of blogging for children as well as a number of tips to help parents keep their children safe in the blogosphere.
Online Safety Tips for Kids
Use the following tips to ensure your child’s online activities are safe:
- Rules: Establish rules for blogging and online activities. For example, children should not use their full name, address, school name, personal photos, and so on online. In other words, personally identifiable information should be prohibited.
- Password protection and privacy: Find a blogging service that allows your child’s blog to be private and password-protected so only established, trusted friends can view it.
- Screen the content: Screen what your child writes before he or she publishes it online and discuss potential problems with him or her.
- Monitor the blog: Monitor your child’s blog on a regular basis. Read the content and comments, follow links, read friends’ blogs, and so on to get a full picture of your child’s online activity as it relates to the blog.
- Talk to your child: Take the time to discuss your child’s blog with him or her. Allow him or her to share what he or she is doing and learning technically and socially with you. As he or she shares his or her knowledge with you, take the time to share Internet safety tips (“street smarts”) with him or her. Make your child’s blog a shared experience. When in doubt, Google your child’s name to get a complete picture of his or her online activities.
Where it Stands
Bottom line, most teens and tweens who want to have a blog will try to do so with or without their parents’ permission. No matter what age your child is, the best way to keep him or her safe is to talk to him or her. Keeping open lines of communication and monitoring their online activity are the best ways to maintain Internet security for children.
- « Previous Page
- 1
- …
- 4
- 5
- 6
